Monday, February 21, 2011

Spindleworks opening reception


We had a great time at the opening reception of the Spindleworks exhibit at the Harlow Gallery! We may have gone overboard with the amount of food but it there's one thing that we know about, besides art, it's food!

And there was a really great turnout for the exhibit; some very friendly new faces, too. And some of the artists were able to make it down and brighten up the evening even more!


The show is open through Saturday February 26th and the Harlow Gallery is open Wednesday through Saturday from 12-6pm. 16- Water St in Hallowell.

Gallery Talk: Thursday, February 24, 2011, 7-8:30pm — $3 suggested donation

Exhibition on View: February 16-26, 2011 – free and open to the public

Monday, February 14, 2011

Spindleworks Exhibit - Sneak Peek #3


The final sneak peek post before the show is open! I had the pleasure of installing the Spindleworks exhibit today and it looks fantastic, if I do say so myself! :)


Opening Date: Friday, February 18, 5-8 pm – Free and open to the public

Exhibition sponsored by us at Sweetland Retreat!
We will also be providing the refreshments at the opening reception so come on by!

Gallery Talk: Thursday, February 24, 2011, 7-8:30pm — $3 suggested donation

Exhibition on View: February 16-26, 2011 – free and open to the public

In February the Harlow Gallery in Hallowell will present Mosaic, an exhibition featuring work by the artists of Spindleworks. Located in Brunswick, Maine, Spindleworks is an art center providing studio and gallery space to 41 artists. The program is one of many arms of Independence Association, an agency whose mission is to assist children and adults with disabilities in achieving full and inclusive lives in their chosen community. Harlow Gallery, 160 Water St, Hallowell, ME

-JRB


Saturday, February 12, 2011

Spindleworks Exhibit - Sneak Peek #2


Caroline Boylston: Purple Tree

Here's another Sneak Peak installment for the Mosaic: Spindleworks at the Harlow Gallery exhibition opening next week! I hope you enjoy these pieces as much as I do. Come to the opening reception and find me (Jamie) - I'd love to hear what pieces strike you the most. And hopefully you'll go home with some fabulous artwork, too.


Kelly Weingart: Data Android 1


Various Artists: Rugs


Anna McDougal: Beets


Various Artists: Scarves


Betty Carter: Embroidered Pillow


Mitch Pfeifle: Knight


Lloyd Whitcomb: Dog


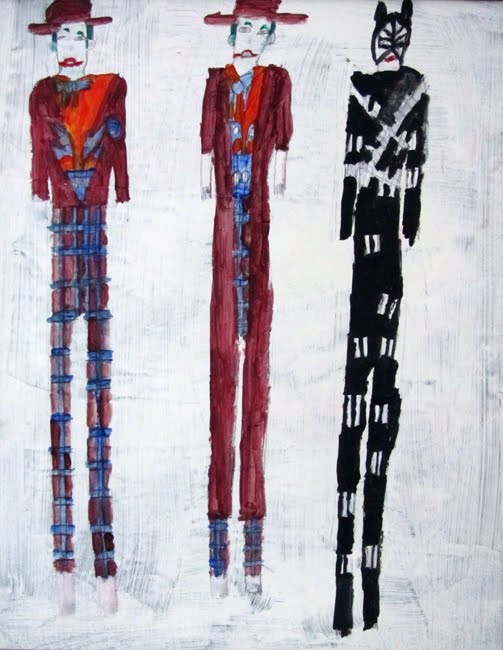
Sam Eberhart: Joker, Joker, Catwoman

Opening Date: Friday, February 18, 5-8 pm – Free and open to the public

Exhibition sponsored by us at Sweetland Retreat!
We will also be providing the refreshments at the opening reception so come on by!

Gallery Talk: Thursday, February 24, 2011, 7-8:30pm — $3 suggested donation

Exhibition on View: February 16-26, 2011 – free and open to the public

In February the Harlow Gallery in Hallowell will present Mosaic, an exhibition featuring work by the artists of Spindleworks. Located in Brunswick, Maine, Spindleworks is an art center providing studio and gallery space to 41 artists. The program is one of many arms of Independence Association, an agency whose mission is to assist children and adults with disabilities in achieving full and inclusive lives in their chosen community. Harlow Gallery, 160 Water St, Hallowell, ME

-JRB

Sunday, January 30, 2011

Spindleworks Exhibit - Sneak Peek #1


Betty Carter: House In the Country

I wasn't exaggerating when I said the work in the upcoming Mosaic: Spindleworks at the Harlow Gallery exhibit was inspiring and fantastic. Every time I look at these pieces I just wish it were me that had made them! Well, here's a sneak peek-- more to come! Keep your eye out.

Emilie Williams: Shawl & Placemats

Diane Black & Minton Warren: Woven Doorstops

Emma Becker: Azaleas

Thomas Ridlon: Colonial

Kelly Weingart: Pez People

Terri Snape: Landscape on Map

Earl Black: Playful Cupboard

Angela Alderete: Alan Jackson

Opening Date: Friday, February 18, 5-8 pm – Free and open to the public
Opening sponsored by us at Sweetland Retreat

Gallery Talk: Thursday, February 24, 2011, 7-8:30pm — $3 suggested donation

Exhibition on View: February 16-26, 2011 – free and open to the public

In February the Harlow Gallery in Hallowell will present Mosaic, an exhibition featuring work by the artists of Spindleworks. Located in Brunswick, Maine, Spindleworks is an art center providing studio and gallery space to 41 artists. The program is one of many arms of Independence Association, an agency whose mission is to assist children and adults with disabilities in achieving full and inclusive lives in their chosen community. Harlow Gallery, 160 Water St, Hallowell, ME

-JRB

Tuesday, January 25, 2011

A tour of Spindleworks studios in Brunswick

I had the extreme pleasure of visiting Spindleworks in Brunswick, ME to curate artwork for their upcoming exhibition at the Harlow Gallery. Sweetland Retreat will be providing the refreshments at the opening reception for the exhibition, entitled "Mosaic" on February 18th from 5-8pm. Here's a quick tour of their fabulous space that would make me happy to create in any day of the week!

Above is their Spindleworks Store -- this alone would overwhelm you with amazing items to choose from. From paintings to poetry books, sculpture to t-shirts, woven shawls to pottery-- you can find anything here.

But the display doesn't end there...in fact, it's all over their studio! Just about everything on the walls is available for purchase.

The work is so striking and the work of the 40+ artists of Spindleworks blend so nicely together.

My favorite room is the weaving/fiber arts studio above. The amount of looms under that great timber roof makes me want to learn to weave.

There are also a couple of rooms on the 2nd floor with looms for a more private workspace. The artists transform these pieces into vibrant table runners, rugs, shawls, balsam fir sachets, and more.

Brian says that the layout at Spindleworks is as if we took our house and had a studio in every single room-- he's right! (And what a dream that would be!)

We sifted through bins and storage areas filled with inspiring art. It was hard to choose what we did even though we wound up selecting a large amount of work. I just wanted to take them all!
They also have a new wood working shop that I would love to create in-- but that seems to be the theme to every room. I just wanted to create!

Here's what I had put aside at the very beginning of getting there-- the pile grew exponentially. I'll do some sneak peak posts as we get closer to the opening. There are so many exquisite pieces that you'll need to come to the exhibition and see them all (and hopefully take a few pieces home with you!)

Opening Date: Friday, February 18, 5-8 pm – Free and open to the public

Gallery Talk: Thursday, February 24, 2011, 7-8:30pm — $3 suggested donation

Exhibition on View: February 16-26, 2011 – free and open to the public

In February the Harlow Gallery in Hallowell will present Mosaic, an exhibition featuring work by the artists of Spindleworks. Located in Brunswick, Maine, Spindleworks is an art center providing studio and gallery space to 41 artists. The program is one of many arms of Independence Association, an agency whose mission is to assist children and adults with disabilities in achieving full and inclusive lives in their chosen community. Harlow Gallery, 160 Water St, Hallowell, ME

-JRB

Thursday, December 23, 2010

Recipe Tutorial: Super Simple Pimiento Cheese Dip/Spread

Let's chat a second about cheese. It is a delicious creation which, I can only assume, was sent down straight from the heavens. Add in some pimientos and now we're talking about a delight sent down from a heaven full of rock stars. You know, the ones that you wish you could party with. Well, that's how I felt the first time I had pimiento cheese.

I was living in the sunny south in Charleston, South Carolina. I remember going to a little cafe in some small town in the "upstate" and seeing grilled pimento cheese sandwich on the menu. Well, now they had my attention. I ordered it wondering what it would be like and when it arrived I realized that I had made one of the best discoveries of my lifetime. Classically served between two slices of white bread, grilled to perfection, and a sweet tea on the side: Rock Star Heaven.

So I began asking local friends for recipes and did some of my own tweaking and came up with this super simple recipe that anyone can make. Have at it! Try it on a sandwich, with crackers, pretzels, or on top of a burger. And I'll tell ya, this recipe is highly adored by my favorite blogger at 145 Crazy Road!


Ingredients:
2 cups of shredded Sharp Cheddar
4oz jar of Sliced Pimientos
1/4 cup Mayonnaise
Salt & Pepper to taste

Tools:
Small Food Processor
Spatula

Let's talk EASY recipe: Put all of the ingredients into the food process (include the liquid from the pimiento jar) and whip it up until the ingredients are all blended together well. Place in the refrigerator overnight and it will thicken up when it sets.


And there you are! An easy and delicious item that can be used for lunch sandwiches, potluck dip, burger toppings, and so much more. Some other variations include adding garlic, pickles, and other ingredients. I find that this recipe is super simple and always a huge hit! Enjoy!


About the author: Joy Ribisi is part-owner of Sweetland Retreat. Having traded in her sunny summer-all-the-time-beach-cruiser-flip-flopping-Southern-living ways for the quiet farm life of New-England-log-splitting-snow-shoveling-earth-digging-lake-swimming life in Central Maine, some things never change. Like enjoying comfort foods.

Wednesday, December 22, 2010

Recipe Tutorial: Gingerbread Cookies (The Whole Grain Version)


Lisa Lancaster, owner of Baked in Maine based in Hallowell, Maine, shares some delicious and mouth-watering recipes on her blog and her facebook page. The recipes are easy to follow with gorgeous photographs. If you're not the baking type or simply don't have time then visit her Etsy shop and purchase your favorite baked goods made fresh for your order. There you'll find everything from Red Velvet Whoopie Pies to Italian Amaretto Biscotti and more. And don't forget to follow her on Twitter!

Today she shares with us her recipe for Whole Grain Gingerbread Cookies just in time for the holidays! Enjoy!

Ingredients:

Dough:

  • 2 cups unbleached all-purpose flour
  • 2 cups white whole wheat or whole wheat pastry flour
  • 1 tablespoon ground ginger
  • 2 teaspoons ground cinnamon
  • 1/2 teaspoon nutmeg
  • 1/2 teaspoon cloves
  • 1/2 teaspoon salt
  • 1/2 teaspoon baking soda
  • 1/2 lb unsalted butter or Smart Balance
  • 2/3 cup brown sugar
  • 2 large eggs
  • 2/3 cup molasses

Icing:

  • 2 cups confectioners’ sugar
  • 1 tablespoon of milk
  • 1 teaspoon of corn syrup, to harden it up (optional)
  • 1/2 teaspoon vanilla (optional)
  • 1/2 teaspoon lemon extract (optional)
  • 1/2 teaspoon almond, my fav. (optional)
  • *1 bag of Red Hot’s, raisins or whatever… (decorations)

Directions:

Prepare 2 cookie sheets with parchment or cooking spray.

  1. Using your mixer, cream the butter and sugar. Beat in eggs and molasses.
  2. In a separate bowl, whisk together the remaining ingredients; and add to the mixer with a large spoon, mixing well.
  3. Wrap dough in plastic wrap and refrigerate overnight or a minimum of 2 hours.
  4. Roll the dough out on a floured surface (try to use as little flour as possible) to about 1/8″ thick. Using a large cookie cutter (I use a 3 1/2″ gingerbread man), cut out cookies, and place on cookie sheets. Roll out dough scraps and repeat, be careful not to overwork the dough.
  5. Bake @ 350 degrees for 8 to 10 minutes or until edges begin to brown slightly. Remove cookie sheets from the oven and allow the cookies to cool for a few minutes on the sheet before carefully removing them to cool on a wire rack before decorating.
  6. Mix up the icing with a whisk (or mixer). Use a pastry bag or a plastic baggie with a tiny tip of the corner snipped off.
  7. Decorate with icing, raisins and Red Hots. Or use whatever you like.
  8. * 1 tablespoon of meringue powder or egg whites will make a firm “Royal Icing”

Have fun!

To order Gingerbread Cookies from Baked in Maine:

http://www.etsy.com/listing/36606819/holiday-gingerbread-christmas-cookies-by


And check out her Tote Bag Giveaway offer, too!

Tuesday, December 21, 2010

Paper Christmas Wreath Tutorial by The Red Thread


Searching for some fabulous last minute Christmas crafting ideas, I came upon a fabulous tutorial by The Red Thread. Her blog is fantastic and one that you'll find yourself going back to time and time again to find a new nifty little craft to grab by the horns! Below you'll find her detailed tutorial on creating this fabulous Paper Christmas Wreath! Grab some papers and get to craftin'!


After creating my advent calendar I had some left over paper and I was inspired to make a paper wreath.

If you'd like to give it a go you'll need the following materials:

• 1 to 2 sheets of wrapping paper - I used the same paper in 2 different colour ways. Think outside the square with your paper choice - you needn't use wrapping paper, it could be magazine pages, plain old white office paper, old comic books, anything! Patterned scrapbooking paper would also look fab. You needn't limit it to 2 patterns, if you kept to a consistent colour palette you could use any numb
er of patterns or plain colurs.• 1 large and one smaller plate, salad bowls or similar to trace around (unless you have a really big compass??)
• lightweight cardboard
I used ivory card, but it could just be the side of a box because it will be hidden. The size you'll need will depend on the size of your bowls.
• scissors
• stapler
• sticky tape• ribbon - roughly 65cm
Start by finding your plates or bowls to trace around. The dia
meter of my large salad bowl is 34cm, and the smaller one is 21cm. If your circles are much larger or smaller you will have to adjust the size of your leaves accordingly. The diameter of my finished wreath is 42cm, which is the perfect size to hang on a door.


1. Place the large bowl upside down on the cardboard and trace around it.

2. Place the small bowl upside down in the centre of the circle you've just drawn and trace around it.

3. Cut around the outside of the largest circle. Then cut across your circle, through
the centre until you reach the far edge of the small circle. Next cut across the line you just cut so you now have a + in the centre of your circle. This just makes it easier to cut the small circle out. Cut out the small circle so you end up with a donut shape. Join the open ends of the donut back together with sticky tape. (of course if you have a craft knife and cutting mat you could just cut around the two circles)

4. Draw a leaf shape about
12.5 cm long on a piece of paper, and cut it out to use as a template. I cut the point off one end of the leaf so I knew which end was the bottom. I used 64 leaves in total, of which 16 were white. The number of leaves you need may vary slightly depending on how much you overlap your leaves.

5. Roll the bottom edges of the leaf together so they overlap and the sides curl up.

6. Staple the rolled leaf to the bottom, just off centre, of the wreath base so the open end of the leaf is pointing out and down.

7 & 8. Continue rolling each leaf as you go, stapling them in position so they overlap the previous leaf. They need to overlap and be placed close to each other so the cardboard base and the staples aren't visible. The leaves should be positioned so that they follow the curve of the wreath base. The placing is fairly random, the leaves aren't in rows. If you are using an accent paper (like my white one) place one for every 4 -6 of the main colour leaves. Make the colour placement random too.


Looking at the back of the wreath you can see that the staples
attach the leaves to the centre of the cardboard ring,
and the leaves fan outwards.


9. & 10. Continue stapling the leaves in place. I found it useful to stop often and hold the wreath at arms length so I could see the overall shape that was being formed. Make sure the tips of your leaves follow the curve of the wreath base.

When you have reached half way stop and go back to your original starting point. Now start again from this point, facing your leaves the other way and going in the opposite direction around the wreath. Make sure that you overlap the leaves at the starting point, so there are no gaps. If this seems a bit too tricky you can always just continue on as you were all the way around the circle so all your leaves will be facing the same way. Complete the circle of leaves.

11. & 12. Tie a half bow in your ribbon so there is a small loop and one short and one long end. Thread the long end behind in the leaves in the top centre of the wreath. Staple the ribbon to the wreath.

The wreath is so light that it can easily be hung with Blu-Tac. I just put a blob each at the top and the bottom of the wreath and one on the top of the ribbon.


And that's it. Using a stapler makes it pretty quick and easy. If you're going to give this a go and any of the directions are unclear I'm happy to answer any questions.

I hope you have as much fun making this as I did.

Important Note: This tutorial is supplied for personal use only.

The Red Thread is the passion of Sydney artist Lisa Tilse, whose
love of colour, design and the radiant imagination of children
led to the creation of these vibrant works of art.